
There are times when an in-app notification (often known as a toast) is not enough to catch your users’ attention immediately. Perhaps they are not actively engaging with your application when there is a time-sensitive action required of them. Or perhaps you have an exciting new feature you want to announce is available. In cases like these, desktop notifications may be a good fit for your app.
Desktop notifications are supported in all modern browsers (sorry Internet Explorer, you’re not invited). Keep in mind the user will have to opt-in and they will also have to allow notifications in their OS settings in order to receive notifications on the system level rather than only within their web browser. I will be covering both these steps in this tutorial.
What we’ll work on today: setting up a basic desktop notification
Let’s create a basic feature that checks for, and gets the user’s permission so we can notify them about our cool new blog posts. We can add actions so the user can opt-in for future notifications when new posts are published as well.
For this we’re going to create a singleton pattern file since it’s needed to load and run when the site is initially loaded and won’t change after or be extended in the future, and is the most human readable.
class NotificationService {
  constructor() {
    // whatever is required when new instance created, completed later
  }

  async _isShowNotificationPermitted() {
    // added later in the post
  }

  async _showNotification() {
    // added later in the post
  }
}

new NotificationService();
We are creating the JavaScript class, NotificationService, with methods that
will handle checking the permission settings, requesting permissions, and then
showing a notification if granted.
Let’s start with checking for and asking for permission to show notifications from our site.
async _isShowNotificationPermitted() {
  if ('Notification' in window) {
    let { permission } = Notification;
    if (permission === 'granted') {
        return true;
    }
    if (permission !== 'denied') {
      permission =  await Notification.requestPermission();
    }
  }

  return false;
}
Let’s break down this method a bit. First, we’re checking for support in the browser, in the off chance your user doesn’t have a supported browser, otherwise why have those needless errors?
The default value from Notification.permission is just that, default, which
we treat essentially the same as denied. This is due to the fact that neither
has indicated the user has explicitly give us permission for notifications. In
that case, we trigger requestPermission() in the API to request access from
the user. If the user approves, we can move on to showing them notifications
until this permission is revoked. Let’s look then at a method for showing one.
async _showNotification() {
  const permission = await this._isShowNotificationPermitted();

  if (permission !== 'denied') {
    new Notification('Be notified of new posts', {
      body: 'Let us notifiy you of new posts on our site!',
    });
  }
}
This method is a bit more straightforward. We check permission, as noted in the previous code example, and as long as we’re not denied, a notification can be shown.
There’s only one required argument, a title. Here we are adding a basic option for body text as well. This will show a notification and the user can dismiss it or select to go to browser settings, if they’d like to change the permissions. Let’s make sure our instance fires off when loaded before we move on.
class NotificationService {
  constructor() {
    this._showNotification();
  }

// ...the rest of the class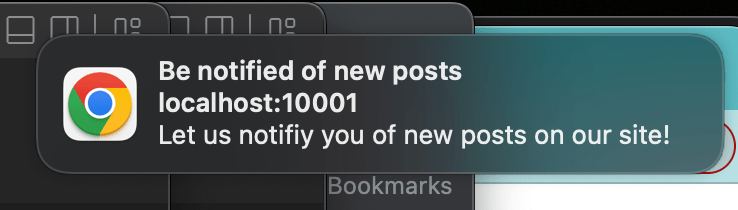
What we’ve now created sends a basic notification; one without any interaction
with the user. To add interactivity, we have to add actions to the options
hash, which allows us to watch for and respond to user actions.
The spec
requires that we only can do that if we’re triggering the notification via a
service worker and responding to events there. Let’s create a basic service
worker file and add a listener. Create a file called service-worker.js and add
the following code.
self.addEventListener('notificationclick', function (event) {
  const clickedNotification = event.notification;
  clickedNotification.close();

  // Do something as the result of the notification click
  const promiseChain = doSomething();
  event.waitUntil(promiseChain);
});
In this snippet we’re watching for a notificationclick event that tells us a
user interaction has occurred.. We’ll want to register our worker in the
notification service and have it trigger the following notification flow.
_startServiceWorker(notificationService) {
  if ('serviceWorker' in navigator) {
    navigator.serviceWorker.register('service-worker.js')
    .then(function(registration) {
      registration.addEventListener('updatefound', function() {
        // If updatefound is fired, it means that there's
        // a new service worker being installed.
        const installingWorker = registration.installing;
        console.log('A new service worker is being installed:',
          installingWorker);

        // You can listen for changes to the installing service worker's
        // state via installingWorker.onstatechange
      });

      notificationService._showNotification(registration);
    })
    .catch(function(error) {
      console.log('Service worker registration failed:', error);
    });
  } else {
    console.log('Service workers are not supported.');
  }
}
In the above, we check for service worker support and then register our newly
created worker file. After it’s installled we show the notification in an
updated _showNotification method.
async _showNotification(worker) {
  const permission = await this._isShowNotificationPermitted();
  if (permission !== 'denied') {
    worker.showNotification('Be notified of new posts', {
      body: 'Let us notifiy you of new posts on our site!',
      requireInteraction: true,
      actions: [
        {
          action: 'dismiss',
          title: 'Dismiss'
        },
        {
          action: 'subscribe',
          title: 'Subscribe'
        }
      ]
    });
  }
}
These changes allow us to set actions on the notification options and allow the
user to interact with the notification, in this case by clicking [what they’re
clicking]. This click will get passed to the worker so we can react with a
response. Let’s do just that and act on the user’s response, with
requireInteraction.
self.addEventListener('notificationclick', function (event) {
  const { action, notification } = event;
  notification.close();

  if (action === 'subscribe') {
    const promiseChain = clients.openWindow(
      'https://feedly.com/i/subscription/feed%2Fhttps%3A%2F%2Fshipshape.io%2Ffeed.xml'
    );
    event.waitUntil(promiseChain);
  }
});
Here we’ve updated the worker to check if the user clicks the subscribe
button. When the event captured and checked that it is to subscribe, we open a
new window with our RSS subscription
link.
If they click dismiss, nothing happens and the notification is dismissed. In
case you want some kind of persistence, we could add some way to track the user
selecting to dismiss and save that state to something like localStorage.
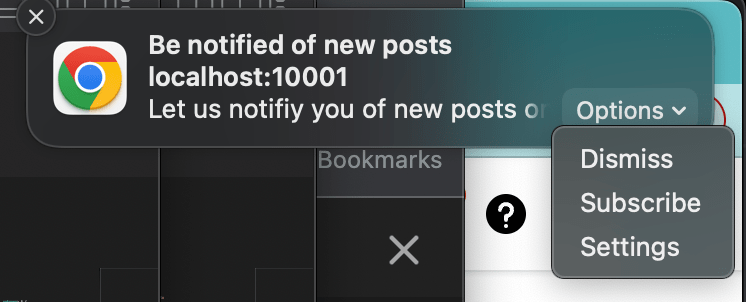
Our final product: [what it does]
In summary, we have created a class to set up a service worker which shows the user a desktop notification that asks if they’d like to subscribe to our blog posts.
Here’s what it looks like all together:
class NotificationService {
  constructor() {
    this._startServiceWorker(this);
  }

  _startServiceWorker(notificationService) {
    if ('serviceWorker' in navigator) {
      navigator.serviceWorker
        .register('/landing/js/service-worker.js')
        .then(function (registration) {
          registration.addEventListener('updatefound', function () {
            const installingWorker = registration.installing;
            console.log(
              'A new service worker is being installed:',
              installingWorker
            );
          });

          notificationService._showNotification(registration);
        })
        .catch(function (error) {
          console.log('Service worker registration failed:', error);
        });
    } else {
      console.log('Service workers are not supported.');
    }
  }

  async _isShowNotificationPermitted() {
    if ('Notification' in window) {
      let { permission } = Notification;
      if (permission === 'granted') {
        return true;
      }
      if (permission !== 'denied') {
        permission = await Notification.requestPermission();
      }
    }

    return false;
  }

  async _showNotification(worker) {
    const permission = await this._isShowNotificationPermitted();
    if (permission) {
      worker.showNotification('Be notified of new posts', {
        body: 'Let us notifiy you of new posts on our site!',
        actions: [
          {
            action: 'dismiss',
            title: 'Dismiss'
          },
          {
            action: 'subscribe',
            title: 'Subscribe'
          }
        ]
      });
    }
  }
}

const notifications = new NotificationService();
Object.freeze(notifications);
This is just one example of how we can add desktop notifications to an app. Be sure not to overload the reasons they are triggered on your site as not to inhibit engagement and make sure to use this power for good. If you would like, please feel free to reach out to us with any questions or requests for future discssions around this topic.